In the previous blog post [link] I have shown you how to use version control (git in particular) for Xilinx/AMD Vivado and Petalinux projects.
In this blog post, we’re going to integrate AMD/Xilinx Vivado and Petalinux with Gitlab CI.
Video
If you prefer this content in video format, it is embedded below.
GitLab Runners
GitLab supports continuous integration with the help of GitLab runners. A GitLab Runner is an application that works with GitLab CI/CD to run jobs in a pipeline. A GitLab runner can be installed on various Linux distributions, docker or even Windows!
In the past I have used GitLab runners to interact with the real world like downloading a bitstream on an FPGA board and running some tests directly on the hardware.
Let’s install gitlab runner on Ubuntu:
curl -L "https://packages.gitlab.com/install/repositories/runner/gitlab-runner/script.deb.sh" | sudo bash
sudo apt-get install gitlab-runner
Docker
We’re going to use a docker container with Vivado and Petalinux to build the FPGA bitstream and the Linux image. Docker provides a lightweight operating system level virtualisation. It allows developers to package up an application with all the parts it needs in a container, and then ship it out as one package.
A container image is described by a file (Dockerfile) which contains a sequence of commands to create the image itself (i.e.: packages to install, configuration tasks, etc) and it is all you need to replicate the exact build environment on another machine.
The objective is to create a container that will run Vivado in headless mode (without user interface) to build the FPGA and Petalinux to build the Linux image.
First, install Docker for your Linux distribution, i.e. for Ubuntu:
$ sudo apt-get update
$ sudo apt-get install ca-certificates curl gnupg
$ sudo install -m 0755 -d /etc/apt/keyrings
$ curl -fsSL https://download.docker.com/linux/ubuntu/gpg | sudo gpg --dearmor -o /etc/apt/keyrings/docker.gpg
$ sudo chmod a+r /etc/apt/keyrings/docker.gpg
$ echo \
  "deb [arch="$(dpkg --print-architecture)" signed-by=/etc/apt/keyrings/docker.gpg] https://download.docker.com/linux/ubuntu \
  "$(. /etc/os-release && echo "$VERSION_CODENAME")" stable" | \
$ sudo tee /etc/apt/sources.list.d/docker.list > /dev/null
$ sudo apt-get update
$ sudo apt-get install docker-ce docker-ce-cli containerd.io docker-buildx-plugin docker-compose-plugin
Then add a couple of users to the docker group (replace matteo with your current user):
$ sudo usermod -aG docker gitlab-runner
$ sudo usermod -aG docker matteo
$ exec newgrp docker
Then download the full Xilinx Vivado image (not the web installer) and the petalinux installer.
The Vivado archive and petalinux install files need to be provided during the container image creation via a web-server. If you don’t have a web-server you can launch a very simple one written in Python 3, just run this command line from the directory were the Vivado and Petalinux install files are located:
$ python3 -m http.serverThis will run a web-server listening on port 8000 and provide the content of the directory where the script is run over HTTP.
The install_config.txt file contains the Vivado installation configuration. I.e. which FPGAs families data should be installed. If you need to customise the configuration file you can generate the file with
$ ./xsetup -b ConfigGenClone or download the repository containing the Dockerfile. This is a fork of an existing Vivado docker image with a few customisations to run recent versions of Vivado plus to install Petalinux.
$ git clone git@github.com:starwaredesign/vivado-docker.gitIf you’re planning to use Vivado Standard Edition, you don’t need a licence file. If a Xilinx.lic file is present in the vivado-docker directory it will be copied inside the docker image.
Now let’s create the docker image. Change the IP address based on your network configuration.
$ docker build --build-arg VIVADO_TAR_HOST=192.168.1.58:8000 --build-arg VIVADO_TAR_FILE=Xilinx_Unified_2022.2_1014_8888 -t xilinx:2022.2 --build-arg VIVADO_VERSION=2022.2 --build-arg PETALINUX_VERSION=10141622 .This will take a few minutes. Make sure you have enough free disc space.
Registering the runner
Now we are going to register the runner with gitlab, so we can use it to build our project. To get the registration token go to the Settings page of your GitLab project, then CI/CD, Runners, Expand, and New project runner.
Register the runner (replace xxxxxxx with the registration token):
sudo gitlab-runner register \
  --url "https://gitlab.com/" \
  --registration-token "xxxxxxx" \
  --description "xilinx:latest" \
  --executor "docker" \
  --docker-image "xilinx:latest"
Add tags to identify the runner, i.e. xilinx. This tag will be used for the CI configuration file.
Make sure you de-select “Enable shared runners for this project”.
Add this to the runner configuration in /etc/gitlab-runner/config.toml
pull_policy = "if-not-present"
allowed_pull_policies = [“always”, “if-not-present”]
This is needed so the GitLab runner will be able to pull the docker image from the local repo.
Once the runner has been registered, it will be used to build the FPGA bitstream and Petalinux image at every commit.
GitLab Integration
How does the GitLab runner know how to build the image?
Inside the git repo there is a file .gitlab-ci.yml. It describes the build or test pipeline, the commands to execute and the files to save after the build.
$ cat .gitlab-ci.yml
build:
variables:
GIT_STRATEGY: clone
image: xilinx:latest
tags:
- xilinx
script:
- source /opt/Xilinx/Vivado/2022.2/settings64.sh && cd fpga && scripts/build_fpga.sh && cd ..
- source /home/xilinx/petalinux/2022.2/settings.sh && cd linux && scripts/build_image.sh devopsexample && cat /builds/swddevops/devopsexample/linux/devopsexample/build/config.log
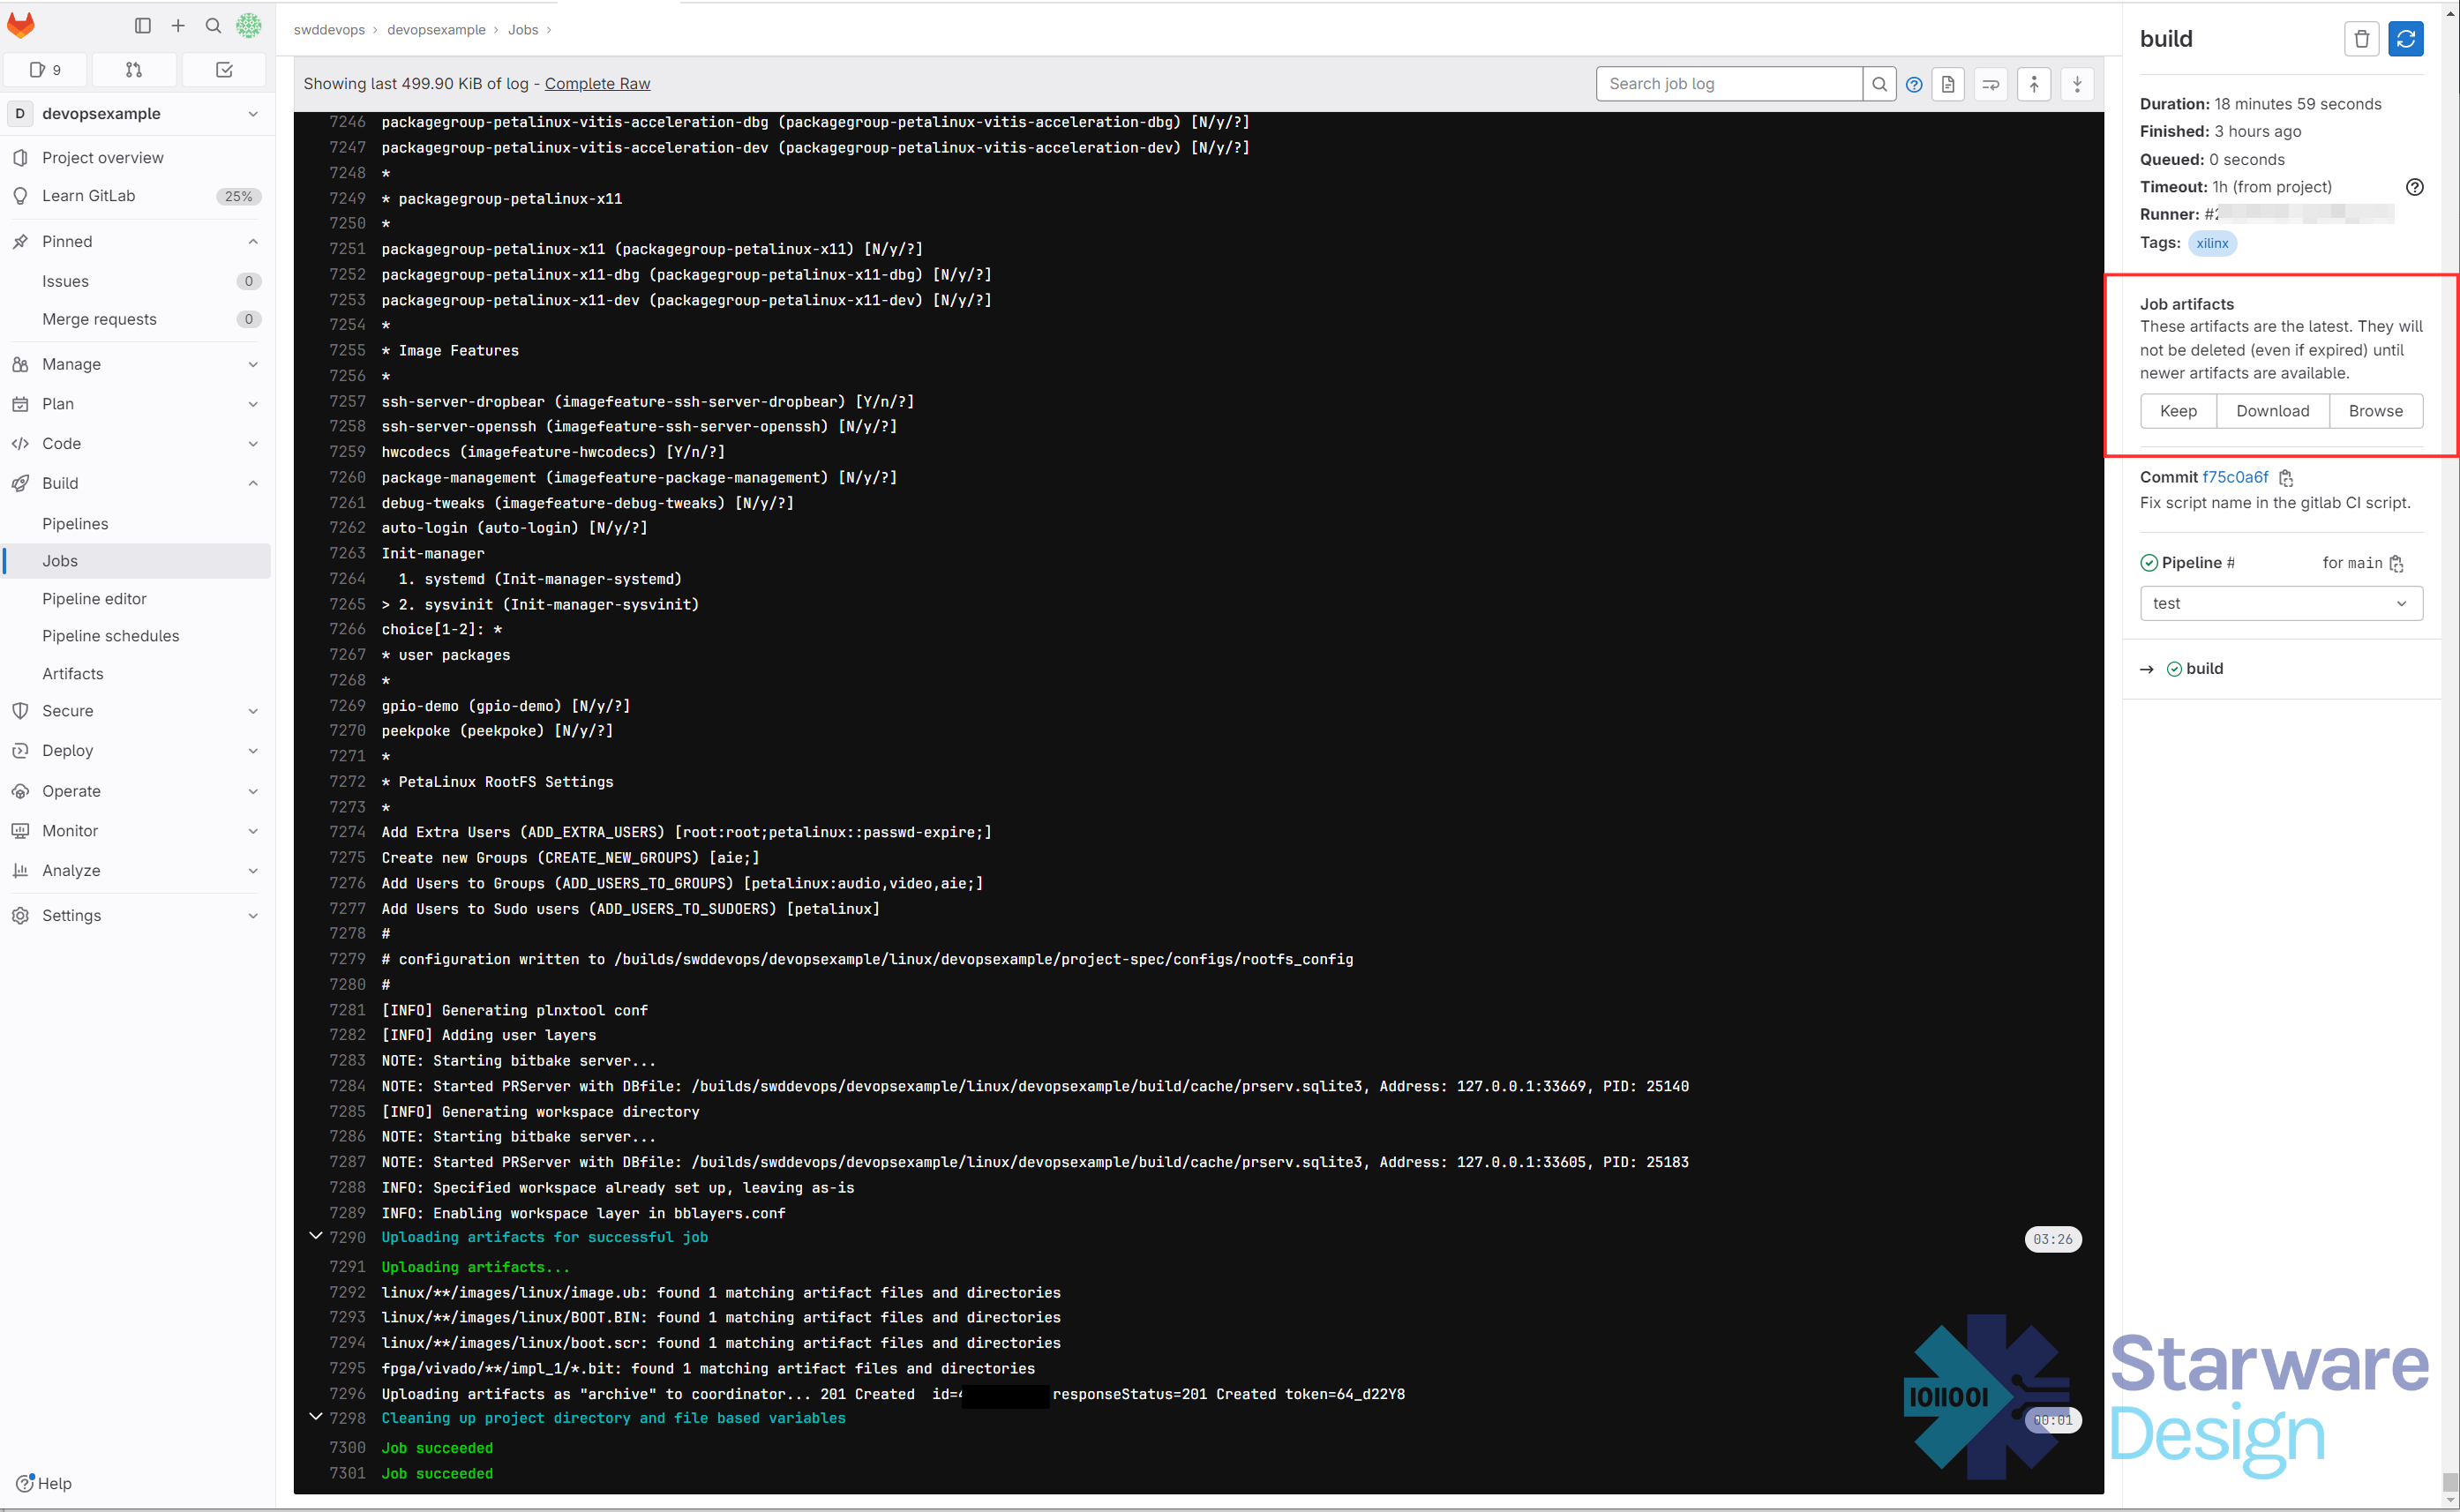
artifacts:
paths:
- linux/**/images/linux/image.ub
- linux/**/images/linux/BOOT.BIN
- linux/**/images/linux/boot.scr
- fpga/vivado/**/impl_1/*.bitLet’s have a look at the gitlab ci file in the example:
- Image is the docker image to use
- Tags are a set of tags to match with the correct CI runner
- Script is the commands to execute
- Artifacts list the files to be saved after the build
Gitlab CI will start building every time changes are pushed to the remote git repo or you can manually launch a build. You can also configure different policies, like having a nightly build. And you could also use gitlab CI to also run simulations, etc.
Once the build has completed you can download the files from the gitlab project page.
Now we can download and copy all the files on the SD card. Put the sd card back and turn on the board.
Disclaimer
All trademarks, logos, and brand names shown on this video are the property of their respective owners. The use of these trademarks does not imply any affiliation with, or endorsement by, their owners. This video is intended for educational/entertainment/informational purposes only, and no copyright infringement is intended.